Battery switch on travel trailer function is crucial for managing your RV’s power. Understanding how these switches work – whether it’s a simple 1-2-both or a more complex setup – is key to safe and efficient power management. This guide breaks down the different types, how to connect and disconnect batteries safely, troubleshooting common issues, and essential maintenance practices.
Get ready to become a travel trailer power pro!
We’ll cover everything from the inner workings of various battery switch types and their safety features to practical, step-by-step instructions for connecting and disconnecting batteries. We’ll also delve into troubleshooting common problems, integrating your battery switch with other electrical components, and maintaining your system for optimal performance and longevity. Safety is paramount, so we’ll also cover essential safety precautions when working with batteries and electrical systems.
Battery Switch Types in Travel Trailers
Choosing the right battery switch for your travel trailer is crucial for managing power and ensuring safety. Different switches offer varying levels of control and protection, so understanding their features is essential before making a purchase or upgrade. This section will detail the common types of battery switches found in RVs and explain their functionality.
Battery Switch Types and Their Function
Travel trailers typically utilize battery switches to isolate and control the flow of power from your house batteries (deep-cycle batteries used for appliances) and potentially a starting battery (for the engine if you have a motorized unit). The most common types are 1-2-Both and 1-2-Off switches.
So, you’re prepping for your awesome travel trailer adventure? First things first: understanding your battery switch on travel trailer function is crucial for keeping the lights on and the fridge cold. Once you’ve got that sorted, it’s time to think about insurance. Securing Aon travel insurance gives you peace of mind, knowing you’re covered for unexpected hiccups.
Get those two things checked off your list and you’re well on your way to a smooth trip!
| Switch Type | Number of Batteries Supported | Function Description | Advantages/Disadvantages |
|---|---|---|---|
| 1-2-Both | Two | 1: Connects only battery 1 (usually the house battery). 2: Connects only battery 2 (usually the starting battery). Both: Connects both batteries in parallel. | Advantages: Simple operation, allows independent control of each battery. Disadvantages: Doesn’t offer a completely “off” position for both batteries simultaneously, potential for accidental parallel connection leading to high current draw. |
| 1-2-Off | Two | 1: Connects only battery
1. 2 Connects only battery 2. Off Disconnects both batteries completely. |
Advantages: Provides a complete disconnect for both batteries, improving safety and preventing parasitic drain. Disadvantages: Slightly more complex operation than a 1-2-Both switch. |
| Single Battery Switch | One | On/Off control for a single battery. | Advantages: Simple and inexpensive for trailers with only one battery. Disadvantages: No control over multiple batteries. |
Internal Workings of Battery Switches
A typical 1-2-Both or 1-2-Off switch uses a rotary selector mechanism. Internally, this involves a series of contacts that are mechanically connected or disconnected based on the switch’s position. For example, in the “1” position, the switch makes contact only with the terminals connected to battery 1.
In the “Both” position (for 1-2-Both switches), it connects both batteries in parallel through a common set of terminals. The “Off” position (for 1-2-Off switches) completely breaks the connection, preventing any current flow. These switches usually employ heavy-duty contacts and robust construction to handle the high current draw of the batteries. A simple diagram would show a rotary selector with three positions (1, 2, Both/Off) and corresponding connections to battery terminals.
Safety Features of Battery Switches
The primary safety feature is the ability to completely disconnect the batteries in the “Off” position (as in the 1-2-Off switch). This prevents accidental short circuits and parasitic drain, which can damage batteries or even create a fire hazard. High-quality switches often incorporate features like robust insulation and clearly marked positions to minimize the risk of accidental operation.
Some switches also include a locking mechanism to prevent unauthorized use. The use of appropriately sized fuses or circuit breakers in the battery wiring is another critical safety measure, regardless of the switch type.
Connecting and Disconnecting Batteries

Connecting and disconnecting your travel trailer batteries using a battery switch is a crucial skill for safe and efficient power management. Improper handling can lead to sparks, short circuits, and even injury. This section will guide you through the process, emphasizing safety and best practices.
Before you begin any work on your battery system, always disconnect the negative (-) terminal first. This helps prevent accidental short circuits and protects you from electrical shock. Remember, working with batteries involves potential hazards, so take your time and proceed carefully.
Safe Battery Connection Procedure
This step-by-step procedure ensures a safe and correct connection of your batteries to the battery switch and subsequently to your trailer’s electrical system. Pay close attention to the polarity (+ and -) to avoid short circuits.
- Turn off all loads: Before connecting or disconnecting batteries, ensure all appliances and lights in your travel trailer are switched off. This minimizes the risk of sparks and short circuits.
- Locate the battery switch: Identify the location of your battery switch, usually near the batteries themselves. It might be a simple on/off switch or a more complex selector switch allowing for various battery configurations.
- Turn the battery switch to the “OFF” position: This isolates the batteries from the trailer’s electrical system, providing an extra layer of safety.
- Disconnect the negative (-) terminal: Using a wrench, carefully loosen and remove the negative cable clamp from the negative terminal of the battery. Set the cable aside, ensuring it cannot accidentally touch any metal surfaces.
- Disconnect the positive (+) terminal: Repeat the process for the positive cable, removing the clamp from the positive terminal. Keep the cables separated from each other and from any metal parts of the trailer.
- Connect the batteries (reverse of disconnection): To connect, simply reverse the above steps. First, attach the positive (+) cable to the positive terminal, then attach the negative (-) cable to the negative terminal. Ensure the connections are tight and secure.
- Turn the battery switch to the “ON” position: Once the cables are securely connected, switch the battery switch to the “ON” position to power your trailer’s system.
Safe Battery Disconnection Procedure
Disconnecting your batteries is equally important, particularly when storing your trailer for extended periods. Following this procedure will help prevent battery drain and potential damage.
So, you’re prepping for your awesome travel trailer adventure? First things first: understand your power! Check out this guide on the battery switch on travel trailer function to avoid any dead-battery surprises. Knowing how to manage your trailer’s power is crucial, and then, don’t forget to sort out your travel insurance! Securing Aon travel insurance before you hit the road provides peace of mind, ensuring you’re covered for unexpected hiccups.
Happy travels!
- Turn off all loads: Again, ensure all appliances and lights are turned off to prevent accidental shorts.
- Turn the battery switch to the “OFF” position: Isolate the batteries from the trailer’s system.
- Disconnect the negative (-) terminal first: Loosen and remove the negative cable clamp from the negative terminal of the battery.
- Disconnect the positive (+) terminal: Then, remove the positive cable clamp from the positive terminal.
Maintaining Battery Terminals and Connections
Regular maintenance of your battery terminals is crucial for preventing corrosion and ensuring reliable power. Corrosion can build up over time, leading to poor connections and reduced battery life.
- Clean terminals regularly: Use a wire brush or terminal cleaner to remove any corrosion from both the terminals and the cable clamps. A baking soda and water paste can also be effective.
- Apply a corrosion inhibitor: After cleaning, apply a thin layer of dielectric grease or corrosion inhibitor to the terminals and the inside of the clamps. This helps prevent future corrosion.
- Tighten connections: Ensure the cable clamps are tightly secured to the terminals. Loose connections can lead to increased resistance and heat buildup.
Battery Bank and Shore Power Switching Flowchart
This flowchart visually represents the process of switching between your battery banks and shore power, highlighting the critical steps for safe and efficient power management.
Imagine a flowchart with these boxes and arrows:
Start –> Shore Power Connected? (Yes/No)
(Yes) –> Battery Switch to “Shore Power” –> End
(No) –> Battery Switch to “Battery 1” or “Battery 2” or “Both” (depending on switch type) –> End
Arrows indicate the flow of the process. The “End” box signifies the completion of the switching procedure. The choice between battery banks depends on your battery switch’s capabilities.
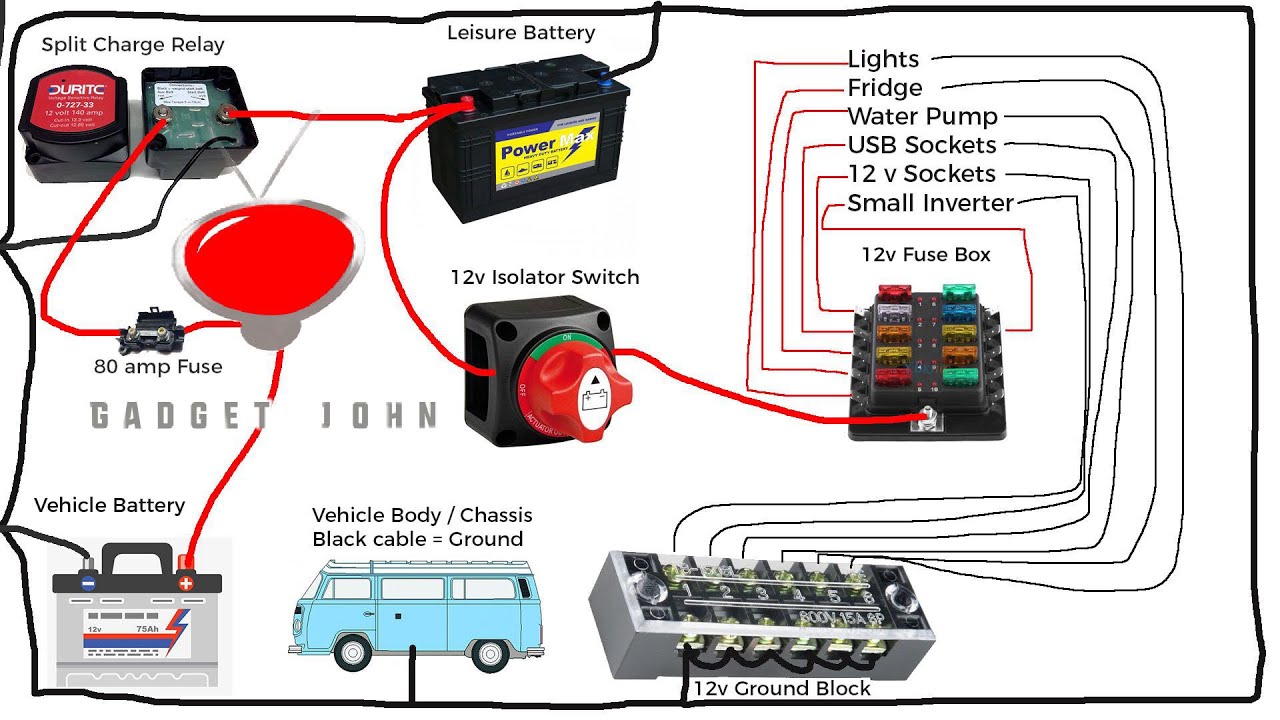
Battery Switch and Electrical System Integration
The battery switch is the central control point for your travel trailer’s 12-volt DC system. It dictates whether power flows from your house batteries to the various appliances and systems, or if the batteries are isolated from the rest of the trailer’s electrical setup. Understanding its role is crucial for safe and efficient operation.The battery switch acts as a gatekeeper, allowing or preventing current from the house batteries to feed other components.
When the switch is “on,” power flows from the batteries to the converter, which transforms 12V DC to 120V AC for your household appliances. It also supplies power to the 12V DC appliances directly, such as lights and water pumps. If you have an inverter, it will draw power from the batteries to convert 12V DC to 120V AC for higher-power appliances.
Finally, a solar panel charger will use the battery switch to charge the house batteries when the trailer is not connected to shore power. If the switch is “off,” the batteries are disconnected, preventing accidental discharge or draining.
Converter Interaction
The converter is the workhorse of your trailer’s electrical system. It takes the 12V DC power from your batteries and converts it to 120V AC to power standard household appliances. The battery switch controls whether the converter can draw power from the house batteries. With the switch “off,” the converter will not be able to function unless an external power source (like shore power) is connected.
A typical setup shows the converter drawing power directly from the battery through the switch, ensuring that power only reaches the converter when desired.
Inverter Interaction
Similar to the converter, the inverter requires power from your house batteries. The battery switch controls this power flow. The inverter converts 12V DC to 120V AC, but usually for higher-power demands than what a converter can handle. A common configuration shows the inverter connected directly to the battery terminals, with the battery switch placed in the positive lead.
When the switch is “off,” the inverter is disabled, preventing accidental operation and battery drain.
Solar Panel Charger Interaction
A solar panel charger is designed to recharge your house batteries using solar energy. The battery switch plays a critical role in this process. The charger is typically wired to the battery terminals, with the battery switch in the positive lead. With the switch “on,” the solar panel charger can supply power to the batteries, recharging them. With the switch “off,” the solar panel charger is disconnected from the batteries, preventing reverse current flow and potential damage.
Wiring Configurations and Their Effects, Battery switch on travel trailer function
Different wiring configurations impact the battery switch’s functionality. Here are a couple of scenarios:
Scenario 1: Simple Configuration
Imagine a simplified system: The positive cable from the battery connects to the battery switch. From the switch, a single positive cable feeds the converter, inverter, and 12V DC circuits. The negative cable from the battery connects directly to the chassis ground. This is a common setup. The switch controls the power to all devices.
When the switch is off, all circuits are dead.
Scenario 2: Separate Circuits
A more complex setup might have separate circuits for the converter, inverter, and 12V DC loads. Each circuit has its own fuse and potentially a separate on/off switch, in addition to the main battery switch. The main battery switch still acts as the master control, but individual circuits can be turned on or off independently. This provides more granular control and safety.
Safety Precautions When Working with Batteries and Switches
Working with 12-volt batteries and the electrical systems in your travel trailer requires careful attention to safety. Ignoring these precautions can lead to serious injury from electrical shock, burns from battery acid, or even fire. Always prioritize safety when undertaking any maintenance or repair work.
Battery acid is highly corrosive and can cause severe burns to skin and eyes. Furthermore, 12-volt systems, while lower voltage than household current, can still deliver a painful and potentially dangerous shock. Improper handling can lead to sparks that could ignite flammable materials, especially in the confined space of a travel trailer. Always treat these systems with respect and follow the guidelines below.
Personal Protective Equipment (PPE) Usage
Proper personal protective equipment is essential when working with batteries and electrical systems. This isn’t just a suggestion; it’s a crucial step in protecting yourself from harm. Failure to use appropriate PPE could have significant consequences.
At a minimum, you should always wear safety glasses or goggles to protect your eyes from splashes of battery acid or flying debris. Rubber gloves are also critical to prevent acid burns and electrical shocks. Consider using insulated gloves specifically designed for electrical work for added protection. Finally, old clothes are recommended, as acid spills can damage fabrics.
Safety Regulations for Battery and Switch Maintenance
Before beginning any work, disconnect the negative (-) battery terminal first. This prevents accidental short circuits. Always remember that order: negative first, then positive. When reconnecting, reverse the order: positive first, then negative. This seemingly small detail is crucial for your safety.
When working with the battery switch, ensure the switch is in the “OFF” position before disconnecting or connecting any wires or components. This prevents accidental activation of the system and potential shocks. Never work on the electrical system while the battery switch is on.
- Always have a fire extinguisher readily available, especially when working near batteries. Battery acid reactions can sometimes generate flammable gases.
- Work in a well-ventilated area to prevent the buildup of potentially explosive hydrogen gas released by batteries during charging or discharging.
- Never smoke or use open flames near batteries or electrical components.
- If you spill battery acid, immediately neutralize it with baking soda and water, then clean the area thoroughly. Seek medical attention if acid contacts your skin or eyes.
- If you are unsure about any aspect of the work, consult a qualified electrician or RV technician.
Proper Handling and Storage of Batteries
Batteries should be handled with care to prevent damage and leaks. Avoid dropping or jarring them. Always store batteries upright in a cool, dry place, away from direct sunlight and extreme temperatures. Proper storage extends battery life and reduces the risk of leaks or explosions.
Inspect batteries regularly for signs of damage, such as cracks or corrosion. Clean any corrosion from the terminals using a wire brush and baking soda solution. If you notice any significant damage, replace the battery immediately. Damaged batteries are a safety hazard.
Mastering your travel trailer’s battery switch isn’t just about convenience; it’s about ensuring safe and reliable power for your adventures. By understanding the different types of switches, their functionalities, and the essential safety precautions, you can confidently manage your RV’s electrical system. Remember regular maintenance and proactive troubleshooting are your best allies in preventing problems and ensuring smooth journeys. So, hit the road with confidence, knowing you’ve got your power under control!
Quick FAQs: Battery Switch On Travel Trailer Function
What happens if I accidentally short the battery terminals?
A short circuit can cause sparks, heat, and potentially damage your battery or other electrical components. Always disconnect the negative terminal first to prevent this.
How often should I inspect my battery switch?
Inspect your battery switch at least once a year, or more frequently if you use your travel trailer extensively. Look for corrosion, loose connections, or any signs of damage.
Can I use a battery switch with different battery types (e.g., lead-acid and lithium)?
Generally, it’s best to use a battery switch only with batteries of the same type and voltage. Mixing battery types can lead to compatibility issues and potentially damage your system.
My battery switch is stuck. What should I do?
Try using a penetrating lubricant on the switch mechanism. If that doesn’t work, you may need to replace the switch. Avoid excessive force to prevent further damage.
